Pages

Showing posts with label Tutorial. Show all posts

Tuesday, 17 May 2016

Bargello quilting - beauty belies simplicity.

I saw a picture of an amazing quilt that looked so detailed and intricate, I thought I would never be able to replicate anything like it. Not least because I lack the patience required to be a really proficient quilter. The bottom drawer of my crafting chest contains "The Guilt Quilt" - or rather the pieces of it. This was what I started when I bought my sewing machine and wanted to try it out without risking damaging a piece of dressmaking. That was probably about twelve years ago! So completing a quilt has always been something that I've felt is likely to be beyond me.

Only then I discovered something.... quilters cheat!! I don't mean to diminish the skills of quilters. I have a huge amount of respect for their craft, and the rather daunting amount of maths it can involve, but I had always assumed that each piece was cut and stitched individually. When I looked into the technique for making a bargello quilt, I discovered that this isn't necessarily the case. This was somewhat of a revelation to me, and has made the whole world of quilting suddenly much more accessible.

In the hope that I can do the same for other people, here's what I've learned about the technique (and my apologies to more highly skilled quilters if I have misunderstood any of this.)

Step 1 - Take a whole load of strips of fabric and stitch them together length-wise. Width doesn't matter. Lengths should be roughly similar. Colour is fairly unimportant, although you can make something truly artistic if you play with colour at this point. Variations of a single colour can look spectacular. Ideally each strip shouldn't clash too badly with it's immediate neighbour, but that can be a design feature in itself.

Step 2 - Stitch the top row and the bottom row together, creating a tube. (Strictly speaking, this step isn't totally necessary, but if you do it you will end up wasting less fabric)

Step 3 - Neaten the ends, and cut across the tube to create a series of loops. This is the bit that blew my mind a little bit. As a dressmaker you learn not to cut across seams that are stitched. But quilters do this quite a lot, and it is a really effective trick for creating intricate patterns quickly and simply. In this case, they can be cut evenly or at different widths according to the desired effect.

Step 4 - Hang the loops off something that gives them free movement. I used a bit of doweling. Broom handles are good too - as long as there is enough length to accommodate all the loops.

Step 5 - Go along the line of loops, shifting each one a little up or down. In my example here I shifted them all in one direction, and only by about half or one centimetre. This worked best since I was only making a small panel.

Step 6 - When you are happy with the general pattern, go along your dowel and snip through each loop. This will turn them back into long strips, but this time each strip will be made up of a series of small squares or rectangles. If you cut along the dowel, you will keep an even edge top and bottom, and have very little squaring off to do at the end.

Step 7 - Stitch all the strips back together in their new pattern. The result is a piece that looks like you've spent hours snipping and stitching tiny bits of fabric, when actually you've been stitching and cutting long lengths.
  

I now have this rather attractive panel that I need to find a use for - I suspect it will end up as the front of a bag.
More importantly, I have a great urge to start cutting lots of fabric strips and stitching them together to create a more substantial piece. I lack the maths-skills to be able to calculate how much fabric I will need to make a piece of a set size (quilters, I salute you for this skill!), but I could always make a selection of panels and join them together......
Ideas are blossoming!

Hx

Thursday, 16 April 2015

Trouser adaptation - from flares to "with flare"

I have a good pair of wool tweed flares, which have seen me through a number of official engagements. They are smart enough to suggest business dress, but the flare hints at unconventionality.
 I hadn't worn them for a while - being off sick meant a lack of business appointments - but I recently decided they had languished in the back of my wardrobe too long. I put them on again for the first time in three years, and was promptly reminded that I've put on weight while I've been convalescing. I can still get into them, but they are now uncomfortably (and rather un-flatteringly) too tight.

Hurrah! Another excuse for an adaptation-job!

My first thought was that there is quite a lot of fabric on these trousers, and that it might look good combined with some crocheted lace and made into a paneled blouse. Whilst hunting out patterns, I was forced to face up to the fact that such a blouse would have to be quite close fitting, and this may not be terribly comfortable in wool tweed.

I began to look at them again, this time bearing in mind that they would be more use to me as trousers, if I could adapt them to accommodate my slightly fuller shape. A few brain-strains later I started to form some ideas.

First things first - get rid of the flares! 

The front and back panels of these trousers are different widths, so I had to measure them separately to work out how much fabric I would need to remove. I also wanted to insert a contrasting side panel all the way down the outside leg (to give extra girth, and to look pretty!). So, this seemed the right time to do a bit of de-construction. I unpicked the outside-leg seam all the way from the hem to the waistband, and the inside-leg seam from hem to just above the knee.

I measured the width of both the front and back panels at various points down the leg and took the narrowest measurement as the width I would make the new legs.
 To ensure that the new leg-shape remains even, any fabric has to be removed from each side of the fabric equally. If I were to cut from one side only, the legs would end up curved!
So, to keep everything balanced the measurements have to be made from the centre outwards. Having measured and marked these, I cut off the excess fabric, and stitched up the inside leg seam again.


I then set about planning for the contrasting side panel. I had a piece of red wool suiting fabric left over from a project some years back. It was long enough and wide enough for this, and although it isn't quite as weighty as the tweed, it is still wool, so washing won't be a problem.

There were two aspects I needed to take into account in re-construction. First, the waistband. A quick try-on and re-measure had convinced me that I was going to have to expand this too! And secondly there is a rather attractive (but somewhat complicating) turn-up on the trousers. This triple-layered cuff, and the waistband would have to be replicated on the contrasting panel to prevent the adaptation from looking like a simple extension-job!

First of all, I had to create the "cuff". If I had been making this garment for someone else, I would have deconstructed the trousers further, undoing the turn-up and re-sewing it when the side panel had been attached. When sewing for myself, however, I am a little less precise. As long as it looks okay from the outside, and wont fall apart, I'm generally pretty happy with it!
I don't think I've ever really studied trouser turn-ups before, but they are actually very clever. There is a real genius to creating them without having an external seam. Here the fabric is folded back on itself, and stitched just below the height of the cuff. The fabric is then folded back again, and a small seam allowance is pinned to the back layer, to be hand-stitched later. It may well be possible to do this last step with a blind hemming foot, but that was more than I could get my head around! (If anyone knows the technique, I would love to hear it)


 The waistband was the second (and simplest) step. Having measured and checked the length, I created a waistband at the top of the piece using the same technique as you would for any garment. This is incredibly simple on a straight piece of fabric. The only complication was ensuring that the finished band matched the height of the trouser waistband.

Finally, I cut the two panels and stitched one into each outer leg seam. Waistband and cuffs were carefully aligned, and the seam allowance was back-stitched  by hand into the garment to prevent any unsightly edges peeping out. The last stage was to hand-stitch the hem on those turn-up extensions.


I'm quite pleased with finished result. I've worn them a couple of times now, and received nice comments. However, the more I wear them, the more I feel that they have a slightly military look. I think I may add some lace detailing to give a little more femininity. I'm sure there's some peach or cream antique lace somewhere in granny's stash. This adaptation may not be over yet - I'll let you know!

Hx

Monday, 28 July 2014

Too old to risk a "muffin top"!

Some years ago, I was given three pairs of fashionable jeans. They were fabulous - well, the two pairs that fitted me were - but slightly too close to the hip for comfort. I always felt uncomfortable with the idea that if I sat or bent down, anyone behind me would get a dramatic view of bum-cleavage! It's not a look I particularly like in others, and I'm definitely not happy about sporting it myself. Apart from anything else, I think you can only really get away with things like that when you are a certain age, or have spectacularly expensive underwear. I am way past that certain age (the words "mutton" and "lamb" spring to mind - hope that's not just a British saying), and I've never felt justified to spend a lot on garments that are hidden from view.

So, apart from the odd occasion worn with a long jumper, I seldom wore these fabulous jeans. And it always felt like a waste to wear them with a long jumper - and lose my waist.

First, a confession. The photos in this post are appalling! My apologies for this. I could use all sorts of excuses, but really these photos are worse than is excusable! I share them because I really want to share the process of adapting these jeans - that is the interesting bit, after all. So I give you my poor photos, my apologies and my promise that I will try harder!

First things first - I took off the waistband. Strictly speaking at this point it was a "hip-band", but the process was the same - care and patience with a seam ripper and a pair of scissors, with extra attention to remove the belt loops and logo-tag in one piece. The transition from hip-band to waistband involved some shortening, but I was lucky. The position of the belt loops and the amount I needed to shorten balanced out. When I cut off a section of the hip-band to make it fit my waist, everything still looked even.
I opted to cut from the button end of the band. This meant that I wouldn't have an unsightly seam in the middle of my waistband, that I could match a new button to buttons I would be including in the extension panel, and that any possible lumpiness that might occur in squaring off the new end would be hidden behind the buttonhole! As it worked out, that last concern wasn't an issue, but I've always been cautious.

The next step was to calculate the size of the panel needed to fill the gap. I won't bore you with the maths involved (although do contact me if you want to know the details), but basically I chose to insert a panel which was the size of the hip measurement, and reduce it to the desired waist measurement by inserting darts. The two pieces side by side looked a bit daunting - and that was before I had cut any length off the waistband! It seemed like I would have some massive darts to incorporate.

Actually it worked out okay. For once I was grateful for my almost "straight-up-and-down" figure (I believe the recognised term is "boyish". I have always craved curves). I managed the required reduction with four reasonably sized darts. I positioned two at the back and two at the front, with each dart extending about half way down the extension panel.

There is a salutary lesson here. When I was calculating the positions of these darts, I measured out from the centre point of the fabric. It seemed perfectly sensible at the time. However, when I came to put all the pieces together, the darts weren't quite where I was expecting them to be! After a bit of head-scratching I realised I hadn't taken into account that stitching the first set of darts changed the measurements. My advice would be - measure and stitch your back darts before measuring for the position of the front darts. It wasn't too drastic as the darts are virtually invisible anyway, but they are a little further over than I was expecting!

My next concern was the seam around the top of the original jeans. I try to over-lock as much as I can, for strength as well as neatness. It wasn't until I had unpicked the waistband of the jeans that I discovered just how much of a scrappy unfinished edge is concealed under that top-stitching! My original plan had been to simply stitch my extension panel to the top of the jeans. However, the condition of that edge gave me concerns that the seam wouldn't hold and the jeans would just fray (not to mention being uncomfortable against the skin). I remembered vaguely having sewn an enclosed seam for a pair of trousers, but it was a long time ago and I couldn't remember the technique. Then, as luck would have it, I stumbled across an explanation for French seams. Hurrah! A solution!

French Seams
For those who are familiar with dressmaking, but not with French seams, here's a brief explanation of the technique.
First, (and completely opposite to sewing normal seams when dressmaking) the two pieces of fabric are stitched together wrong sides facing.
To be honest, this concept messed with my head a bit. It goes against everything I've ever done when dressmaking. The reason it feels so awkward is that when the seam has been sewn all the rough edges are on the outside of the garment. I had to pin and check several times before I dared put it under the sewing machine. Even knowing that the seam wasn't yet complete, it just felt incredibly wrong!

The next step is to fold the pieces of fabric over, so that they are right sides together. This makes more sense to dressmakers! Re-pin the seam-line, enclosing all those rough edges.
On finer fabrics, or when the bulkiness of the seam might be an issue, the seam allowance can be trimmed prior to doing this. When this part of the seam has been stitched you are left with a totally enclosed (and very strong!) seam.
Incidentally, you can see in this photo that I applied interfacing to the ends of the extension panel. This is to give added structure where the buttons and buttonholes will be placed.


...And on with the jeans!
Although you would generally trim down the seam allowance I didn't bother, as the finished French seam would later be top-stitched. By using a thread that matched the colour of the original seams, this gives some continuity to the added panel. It begins to look like it has always been there. It also makes the seam very, very strong. Long after these jeans have dissolved and perished, that seam will still be intact!

The final stages were fairly simple. Firstly I reattached the now shortened waistband by pinning it in place and top-stitching it in the matching thread.
The belt loops and logo-tag were a little harder to deal with. Due to the bulkiness of the layers I found that my sewing machine didn't want to feed the fabric loops, so I applied "on-the-spot" zig-zag stitches at each end instead.
The logo tag had such defined stitch holes in it that it seemed a waste not to use them. I hand-stitched the base of the tag into place.

Then it was simply a case of placing buttons and buttonholes in the newly extended front. I included two extra buttons to the extension panel, and matched them with a third on the original waistband. By doing this I managed to avoid having to remove and replace the zip - that's far too daunting for me at the moment! If I ever pluck up courage to tackle changing a jeans zip, I'll let you know how I get on.
H.x

Tuesday, 13 May 2014

Blackwork - my stitching meditation

Needlework appeals to me intermittently. I've become absorbed by cross stitch on occasion. However, the life of a self-employed entertainer can take up a lot of time. As any self-employed person will tell you, you can end up working far more hours than a regular employee, and time consuming hobbies can end up taking a back seat!

So the immobility enforced on me by my illness gave me the opportunity to revisit the joy of needlework. I discovered a new form of needlework I hadn't encountered before - blackwork.


The History blurb
I've researched a bit (mostly because I was trying to find out how to do it, but also to find out why it was called "blackwork" when it is done in any colour!), and I find the history quite interesting.

Known to date from the 15th/16th Centuries, blackwork seems to have grown from a desire to have lace decoration on clothing. Lace was extremely expensive and hard to access, so a technique of reverse running stitch in geometric designs was used. It's benefits were that it looked the same on both sides of the fabric, and if stitched in black thread gave the impression of lace but at a fraction of the price.
Blackwork is also known as Spanishwork, having been believed to have come to Britain from Spain with Catherine of Aragon (she who is better known for being that rare breed, a spouse of Henry VIII who lived to tell the tale!)
Blackwork is also known as Holbein stitch - but this has nothing to do with the artist's abilities with a needle! This alternative name stems from the painter Holbein depicting detailed illustrations of clothing in his oil-paintings. Art enthusiasts can check out collars and cuffs in his paintings to find examples.
The variations in colour came later, presumably from the monotony of only ever working with black thread! These in turn developed and spawned "redwork" and "goldwork" (but not "whitework", which is formed of completely different techniques)


For further reading about the history and ideas of designs, check out:


The technique
Actually the technique is very simple. If you take the basic "in, out" of running stitch going from left to right, you get...
_  _  _  _  _  _  _  _  _  _

But if, when you reach the end of the line, you come back with a running stitch that fills in the gaps ("out, in"), your line becomes solid. I've shown it here with left to right stitches in black, and right to left stitches in red. Of course, in reality they would all be in the same colour.
___________________

Fiendishly simple! But also extremely boring if all you ever do is straight lines. Where blackwork becomes intricate, and indeed where it gathers it's beauty, is from the ingenious changes of direction that develop it's elaborate patterns.

The pieces
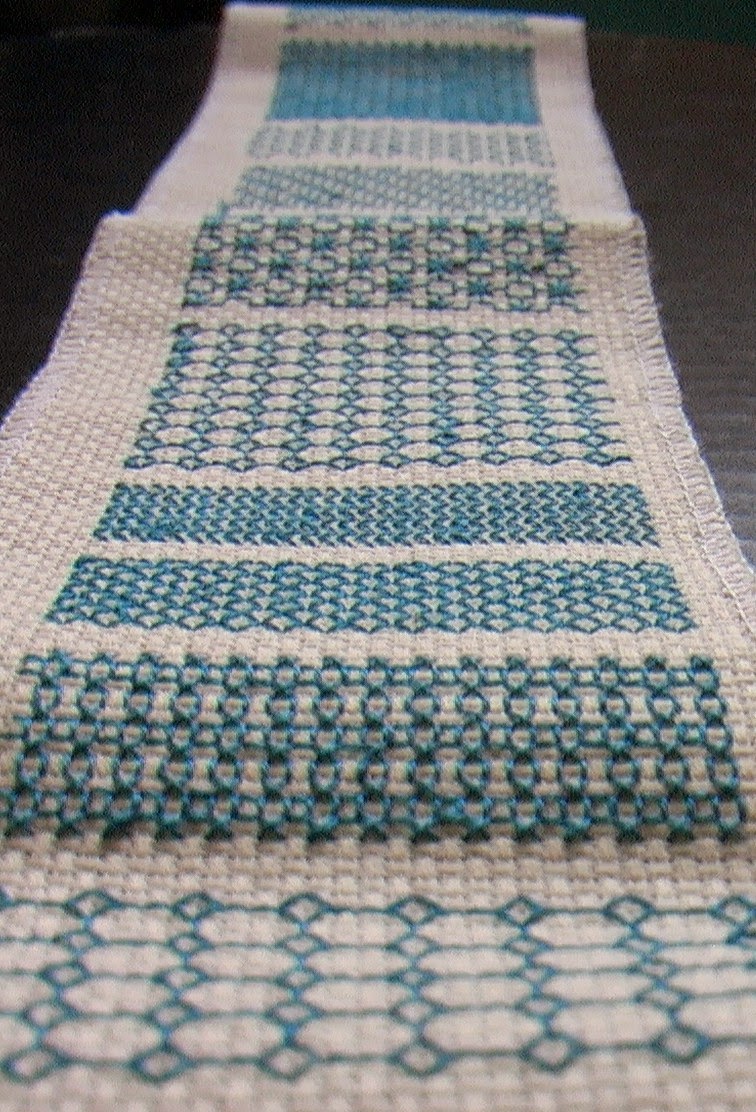
The first piece I did started out as an experiment in working different stitches, and rapidly turned into a banner sampler. I guess I was creating a sampler for exactly the same reason that our ancestors used to make them - as a record of how to do certain stitches. I love the concept that things we look at as pure decoration now, were essential records in the days before computers, photographs or photocopies!

I quite liked the fact that I had completed it all in one colour, despite protestations from hubby who felt that it should have a greater variety.

The "Snowy Rooftops in Prague" shown at the top of this post was where my inspiration took me with the technique. I saw a black-and-white photo in a magazine of the scene, and it seemed the perfect match for this style. To be honest, it is a bit of a cheat!
First of all, if it were true blackwork, it would all be worked in a single colour - not necessarily black, as I have already mentioned. I used four colours for this piece - black, white, and two shades of grey. It's less authentic than using the stitching to create all the shading, but it worked for me.
Secondly (cardinal sin, this one), as I couldn't work out how to create it purely from counting the threads, I drew the picture on the back of the canvas. Yes, I know! I can hear the purists out there tutting at me. It meant I was able to create the picture, though. (Strictly speaking it also means that all the buildings are back-to-front, but no-one has noticed that yet....)

More importantly at the time, I discovered this was one of the few things I could actually do at the height of my illness. When your body is throwing all the symptoms of anxiety attacks at you, all you can do is lie still and focus on your breathing. When you've been doing this for a few hours, it starts to get frustrating. Following the patterns of blackwork stitches was not only something I could do without having to stand, or even sit up, but it became quite therapeutic. Concentrating on these simple yet intricate designs became a form of meditation for me, as well as placating my sense of guilt at staying still for so long.

So, when I later resolved to quit smoking (successfully, I am proud to report) blackwork seemed like the ideal distraction whenever I craved a cigarette. It worked!

Firstly I experimented with using the shading of blackwork stitches to form a rose design. It didn't quite work, but then I was using a cross-stitch pattern. Technically, I did it properly this time, by counting the stitches rather than drawing the design. I think it failed because I didn't have enough contrast between the stitches to give the shading, and because the design was too small. Shading with stitches that are only one square of Aida fabric wide is simply too tricky! But every failure is a step towards perfection....


I then played with a couple of designs I'd found - one for daisies and one for lilies. The two were separate designs, but I combined them to change the shape of the final piece.


Having been quite inspired by this, I went online to seek images of and patterns for blackwork. There are thousands! I've gathered a few that I would like to try in the future, but I've overwhelmed myself a little. The images have to sit in my "ideas" notebook for a while, until I'm ready to commit to working on them. This is quite common for creative types, I believe - ideas need to ripen before we can produce them effectively. Good thing I have lots of pages in my notebook!

H.x