Pages

Showing posts with label Household. Show all posts

Tuesday, 20 December 2016

Beaded stars and strings of hearts

Oh dear. I've found Pinterest. I had avoided it for ages, but have finally succumbed. Why didn't I do this before???!!!

I am simultaneously drowning in inspiration and gasping with a drought of time - too long spent gazing excitedly at the computer screen. So, quite apart from the compulsory Christmas makes, I am only allowing myself to be distracted by the quickest of makes... or those which could become Christmas presents. (The justifications of a self-confessed crafting-addict!)

These two projects fall into a category each. The string of hearts was so ridiculously easy that I felt the need to complicate it slightly by needle-felting the fabric before making up. Fun, and still speedy, and at about a metre-and-a-half in length, it looks impressive too.


The beaded stars came about because I saw a tutorial at the exact moment that I needed an absorbing project that wasn't too complicated or time-consuming. Perfect. As a result I've made a fair few, and most of my friends will be getting one for Christmas.

Have a happy and crafty Christmas, everyone.
Hx


Saturday, 24 September 2016

Distractions!!

I've always had a bit of a scatter-gun approach to crafting. Like many crafters, I love trying new techniques and experimenting with different crafts. Unfortunately this can lead to quite a few UFO's (un-finished objects!) as I spot a new technique before I've finished a project, and just can't wait to dive in.

I have tried to be strict with myself, making an unwritten rule that I will only have three projects on the go at any one time and that I am not allowed to start an new project until I have finished one. This fails. One glance at my "PHD list" is evidence of this. The list has a couple of items that have been there for months (if not years). These are projects that have been abandoned for one excuse or another, but always usurped by another idea.

And then there are projects that are completed before they can even make it to the list. These are generally quick makes that I've seen somewhere else, that I just have to try out immediately. So, in homage to the long-suffering unfinished pieces (they'll get completed one day), and as a tribute to those rapid impulse projects, I am listing them both here. All the pictures are of the distraction projects.

Unfinished/interrupted/stalled projects

  • the guilt quilt (a pile of patchwork squares and cut pieces in the bottom drawer of my craft cupboard)
  • the T-shirt patchwork - I blame this stalling on my overlocker becoming temperamental. It's a flimsy excuse
  • A teddy bear - I've got as far as cutting it out....
  • Canvaswork embroidery - to be fair, I can only do this for short intervals
  • and then there are any larger dressmaking, knitting or crochet projects that I might have on the go at any one time.....

Interrupting impulse makes

  • wet-felted flowers - I saw how easy this was on TV, and had to try
  • Flat-wire "rose" rings - I got a lucky-dip jewellery-making bag, and had no idea what to do with the flat wire enclosed. After researching, I had to see if it was possible....
  • Crochet hexagons - just make up a sample to see if my idea will work on a bigger scale
  • French beaded flowers - seemed like a good way to use up some of those masses of seed-beads I was given
  • Beaded dragonfly - same excuse!
  • Underwear - well, I need some new ones, they're fairly quick, and I have to perfect comfort as well as prettiness
  • Hairpin crochet - this is great! It will work up fast and looks amazing. Need to check I can do it before I try and tackle a big project.
  • Netting bag - again, I can do this quickly just to experiment. I think it will be really useful in the future...
Well, you get the idea. I'm sure I'm not the only crafter guilty of such fickleness! Hurrah for eclectic skills!
Hx


Friday, 29 July 2016

Cushion covers

 These cushion covers were a kind of commission/Christmas gift. My Mum has two larger-than-average cushions that she wanted covers for, and having dropped a couple of massive hints, and told me the size of the cushions, she left me to it.


The design is all my own - the slashed effect was in my mind all along, but the actual dimensions got worked out as I went along. The slashes were created by sewing in panels of a contrasting fabric, with a slight overlap - in a similar way to stitching in a regular zip. I then alternated opening and closing the overlap, holding it in place with a few hand-stitches.

The detail I am proudest of in these cushions is the piping. I had never attempted adding piping to anything before. Here I made it from scratch - wrapping cord in the same contrast fabric I used in the slashes, before attaching it around the edges of the front panels. I really like the effect, and the way it pulls all the details together.


As an interesting aside, we are always told to photograph pieces in natural light. My Dad took these photos of the completed cushions (you can tell by the superior quality of the pictures!). Both the cushions are exactly the same, and we couldn't work out how they look like they are different colours in this picture. Eventually we realised it was because of the lighting. To the right of the picture is a large window streaming natural daylight, and to the left he had switched on an electric lamp. It's the clearest example I've seen of the difference lighting can make  to pictures.

Hx

Tuesday, 17 May 2016

Bargello quilting - beauty belies simplicity.

I saw a picture of an amazing quilt that looked so detailed and intricate, I thought I would never be able to replicate anything like it. Not least because I lack the patience required to be a really proficient quilter. The bottom drawer of my crafting chest contains "The Guilt Quilt" - or rather the pieces of it. This was what I started when I bought my sewing machine and wanted to try it out without risking damaging a piece of dressmaking. That was probably about twelve years ago! So completing a quilt has always been something that I've felt is likely to be beyond me.

Only then I discovered something.... quilters cheat!! I don't mean to diminish the skills of quilters. I have a huge amount of respect for their craft, and the rather daunting amount of maths it can involve, but I had always assumed that each piece was cut and stitched individually. When I looked into the technique for making a bargello quilt, I discovered that this isn't necessarily the case. This was somewhat of a revelation to me, and has made the whole world of quilting suddenly much more accessible.

In the hope that I can do the same for other people, here's what I've learned about the technique (and my apologies to more highly skilled quilters if I have misunderstood any of this.)

Step 1 - Take a whole load of strips of fabric and stitch them together length-wise. Width doesn't matter. Lengths should be roughly similar. Colour is fairly unimportant, although you can make something truly artistic if you play with colour at this point. Variations of a single colour can look spectacular. Ideally each strip shouldn't clash too badly with it's immediate neighbour, but that can be a design feature in itself.

Step 2 - Stitch the top row and the bottom row together, creating a tube. (Strictly speaking, this step isn't totally necessary, but if you do it you will end up wasting less fabric)

Step 3 - Neaten the ends, and cut across the tube to create a series of loops. This is the bit that blew my mind a little bit. As a dressmaker you learn not to cut across seams that are stitched. But quilters do this quite a lot, and it is a really effective trick for creating intricate patterns quickly and simply. In this case, they can be cut evenly or at different widths according to the desired effect.

Step 4 - Hang the loops off something that gives them free movement. I used a bit of doweling. Broom handles are good too - as long as there is enough length to accommodate all the loops.

Step 5 - Go along the line of loops, shifting each one a little up or down. In my example here I shifted them all in one direction, and only by about half or one centimetre. This worked best since I was only making a small panel.

Step 6 - When you are happy with the general pattern, go along your dowel and snip through each loop. This will turn them back into long strips, but this time each strip will be made up of a series of small squares or rectangles. If you cut along the dowel, you will keep an even edge top and bottom, and have very little squaring off to do at the end.

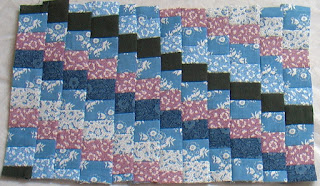
Step 7 - Stitch all the strips back together in their new pattern. The result is a piece that looks like you've spent hours snipping and stitching tiny bits of fabric, when actually you've been stitching and cutting long lengths.
  

I now have this rather attractive panel that I need to find a use for - I suspect it will end up as the front of a bag.
More importantly, I have a great urge to start cutting lots of fabric strips and stitching them together to create a more substantial piece. I lack the maths-skills to be able to calculate how much fabric I will need to make a piece of a set size (quilters, I salute you for this skill!), but I could always make a selection of panels and join them together......
Ideas are blossoming!

Hx

Monday, 8 December 2014

A circle of hearts

This is another idea I had for needle-felted fabric. Again, I was using re-purposed sweatshirt fabric as a base, and I needle-felted wool scraps onto it for a pattern. I then cut out the heart shapes, along with a neutral fabric for backing.


In contrast to the heart-shaped badges I have previously made, this time I slightly stuffed each heart as I stitched them up. This gives a satisfying plumpness to the pieces.
When I had completed a number of the hearts, I sewed them together into the circle shape. Eight hearts seems to be the minimum number that worked (without producing a very strange shape!), but more could have been effective too.

 I then tied a bow in ribbon that matched the sewing thread, and stitched it onto the top of the heart circle to create a hanging loop.


 I like the result, and made these two matching heart banners to hang alongside. The construction technique was basically the same, although this time I anchored the ribbon through the centre of each heart as I stitched them together.


It is difficult to tell from these pictures, but the ribbons form a loop at the top of each banner. The pieces can be suspended as a decorative group, or positioned separately to provide individual decoration. A bit of loving warmth for this festive season.....


Happy Christmas, all!
H.x

Saturday, 16 August 2014

When craft projects sneak up on you!


I have a long list of craft projects I wish to make. I try to put new ideas onto this list, and use it as a reference point when I stall creatively.

So I was a little surprised to find that I had made an entire piece (this crochet coaster), without any planning, any intention, and with no idea that I was completing a finished item!

I started out having seen a demonstration for how to crochet granny squares. I was waiting for the garage to come and pick up my car. So, no going out, and no wish to get deeply involved in doing anything, because I would be interrupted. This seemed like a good time to try out the crochet technique.

Upstairs, I have a bag full of scraps of wool - the oddments from knitting projects. But they were upstairs, and I was downstairs, and I really couldn't be bothered to go and find them. (I tell you this to illustrate just how little planning went into this project - although I am aware that it makes me sound very lazy!)

Instead I grabbed a ball of space-dyed wool I have for needle-felting from a cupboard beside me.  I started to try out the technique, and it worked. So, I kept going. And the garage man didn't arrive. And I kept going. And he still didn't arrive. And I realised I had mastered the technique, and could probably stop.

And then I noticed that when I finished the row that I was crocheting, the square would be exactly the right size for a coaster. I completed the row, and sewed in the loose ends. Hey-presto! A project completed without any thought process!

Craft projects are sneaking up on me when I least expect them. I am becoming a stealth-crafter! I'm hoping this is a good thing to be.
H.x

Thursday, 29 August 2013

Distracted by a cushion!

I'm very aware that the things I have listed as my "works in progress" bear very little relation to what I am writing about in my posts. In some cases this is because I started writing long after finishing the projects and it is only now that I am sharing them with you. In other cases, as with this one, it is because I've been completely carried away by an idea, and have decided to quickly run it up before finishing anything else!


I saw a technique for crazy patchwork, and it set my mind buzzing as a use for all the oddments of fabric I have left over from dress-making. I've got lots of oddly shaped bits and pieces stashed away - leftovers from cutting out garments. They are too big to throw away, but not big enough to be of much use (rag-rugs excepted!) Then I saw this technique of "stitch and flip" which would successfully find a use for them.

There are waste pieces from blouses, trousers, skirts and shirts, as well as a few bits I've held on to just because I thought they were too good to throw out. I cheated a bit by stitching them onto a backing fabric (in this case, an old t-shirt I was going to throw out), and then backed the whole thing to make this envelope cushion cover.
Hurrah for never throwing anything away!
H.x

Monday, 15 July 2013

Roman blinds in Argentina

Hubby and I are building a house in Argentina. He has family there, and we both love it, so it seemed like a sensible thing to do. Every month we send over a bit of money, and a bit more gets added to the house. It has been growing steadily for a few years now, and we get over there to see it as often as we can - which is not as often as we would like!


I know this is a getting a bit ahead of myself, but as soon as the windows were put in I grabbed a sewing machine and started making curtains! As you can see from the photo, there's still so much work to be done on the house itself. We need light-fittings, cupboards, furniture, stairs! But I couldn't resist.

I bought one of those tiny sewing machines that only does straight-stitch, and took it over in my suitcase. They are only really designed to make the odd hem repair, but so far I have managed three blinds, and I haven't destroyed it yet! I bought the fabric in the local town, and the support slats are made from bamboo that grows wild in the garden. That kept hubby busy for a while - he cut and stripped the canes before drying them. Bamboo canes are incredibly difficult to keep straight as they are drying. He then cut them to the correct lengths for me.

For the cords I used a string that is sold locally for tying sausages! It's not ideal, but it will do until I can find something better. The whole thing has a slight feeling of "make do and mend", but I won't worry about it being perfect until the rest of the house is a bit more complete.

H.x

Saturday, 2 March 2013

Rag Rug

I've made rag-rugs before, but always used a hook and latched hundreds of scraps onto a piece of hessian. It's fun, and fantastic for using up small pieces of irregular fabric that are left over when cutting pieces for dressmaking. However, it's also extremely time-consuming, and very hard on the fingers!

So I was delighted when I found a pattern in a magazine for a rug made with larger panels.

The pieces are layered together and stitched on the bias at a space of 1.5-2 inches apart. All the layers except the bottom one are then cut, and the whole thing is put through the washing machine to give this ruffled "chenille" appearance. Not every layer has to be the full size, and layers can overlap, as long as they are neatly sandwiched between a full-sized top and bottom layer.

 I was particularly pleased to find this pattern. My top and bottom layers were made up of some very good wool shirt fabric. Unfortunately the moths had had a munch on it, so it was full of tiny holes, but it was such fine fabric that I felt heart-broken at the prospect of having to throw it away. This provided the perfect use for it.

The other layers were made up of pieces of fabric that also meant something to me in one way or another. The brown floral fabric was a piece of vintage cotton that came from my grandmother. The black and white check, the red and turquoise/black/purple pieces were all left over from  various garments I had made myself. The yellow was a piece of corduroy that I had dyed to make the closest thing I could to a pair of medieval "Marigolds". Probably better not to try and explain that one, beyond saying that it was for a show I was in!

There are probably other fabrics in there too, but as they are not easily visible I won't bore you with descriptions.

I'm pleased with the result. Even hubby (whose constant cry is "Why don't you just throw it away?") likes it and was impressed with my use of seemingly redundant pieces of material. And it is comfortingly soft and fluffy under foot.

H.x